
Most virtual private networks can connect to multiple or unlimited individual devices, such as phones, PCs, and tablets. However, using a VPN through a router is still a smarter and more convenient way to ensure that all the devices in your home or office are protected, including those that did not originally support a VPN network.
The VPN router works by channeling all connections from your home devices to a secure VPN server, thus reducing the need for individual or manual connections.
SEE: Brute force attacks and dictionary: A guide for IT leaders (TechRepublic Premium)
Not all routers support VPN, so if you have confirmed that your router supports a VPN network, follow this simple guide below to install a VPN on your router.
1
ESET PROTECT Advanced
Employees by company size
Micro (0-49), Small (50-249), Medium (250-999), Large (1000-4999), Business (5000+)
Any size of company
Any size of company
Characteristics
Advanced Threat Defense, Full Disk Encryption, Modern Endpoint Protection, Server Security
2
ManageEngine Log360
Employees by company size
Micro (0-49), Small (50-249), Medium (250-999), Large (1000-4999), Business (5000+)
Micro (0-49 employees), small (50-249 employees), medium (250-999 employees), large (1000-4999 employees), enterprise (5000+ employees)
Micro, Small, Medium, Large, Enterprise
Characteristics
Activity Dashboard, Advanced Threat Scanning, Analytics/Reporting, and More
3
gray trunk
Employees by company size
Micro (0-49), Small (50-249), Medium (250-999), Large (1000-4999), Business (5000+)
Medium (250-999 employees), Large (1,000-4,999 employees), Enterprise (5,000+ employees)
Medium, Large, Company
Characteristics
Anomaly detection, audit logs, compliance reports and more
A step-by-step guide to installing a VPN router
Different routers may have different configuration processes. But in general, the steps are somewhat similar. For this installation guide, I will describe how to set up a VPN on an AsusWRT router.
-
Find out your router's IP address
The first step is to turn on your router and connect it to your computer (either wired or wireless). Next, find out your router's Internet Protocol address. Typically, the default IP address of most routers is 192.168.1.1 or 192.168.50.1. But that is not always the case. You can simply type the URL of your router manufacturer into any web browser. Since I'm using an Asus router, I'll simply type www.asusrouter.com oo into the web GUI. This will direct me to the router's administration panel.
-
Connect to your router control panel
Once your browser opens, you will be asked to enter your router credentials (username and password). If you haven't set up your router before, note that the default credentials are usually admin/admin or passwordless admin.
-
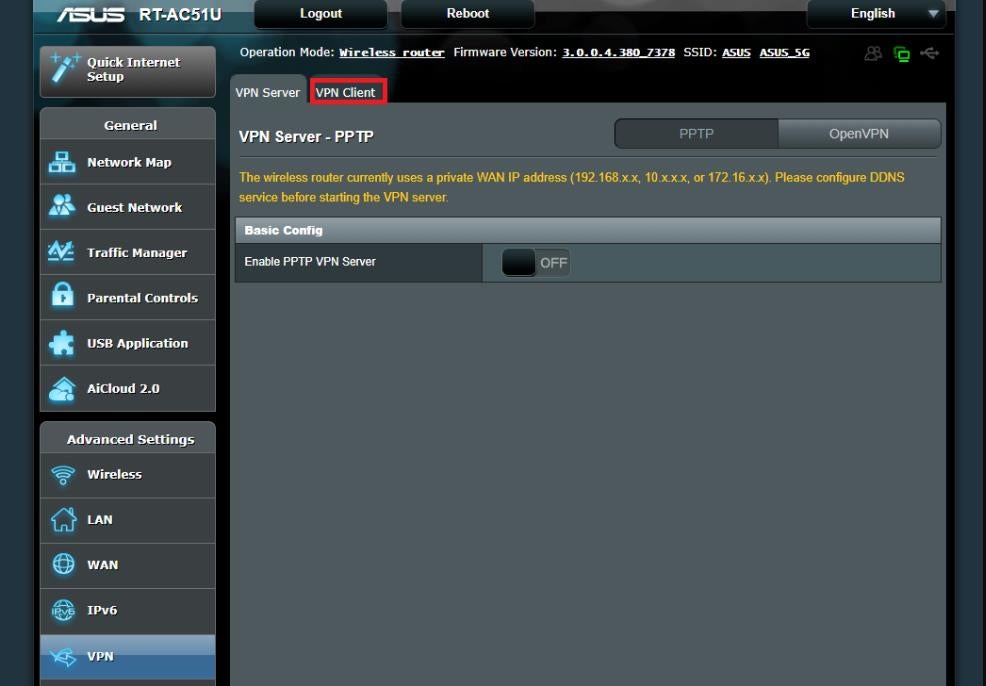
Select VPN client
After logging into your router's control panel, click on the VPN Client tab. The location of this tab depends on your router model; In many, it can be found in the “Advanced Settings”. If you cannot find the VPN client tab, it means that your router does not support a VPN network.
-
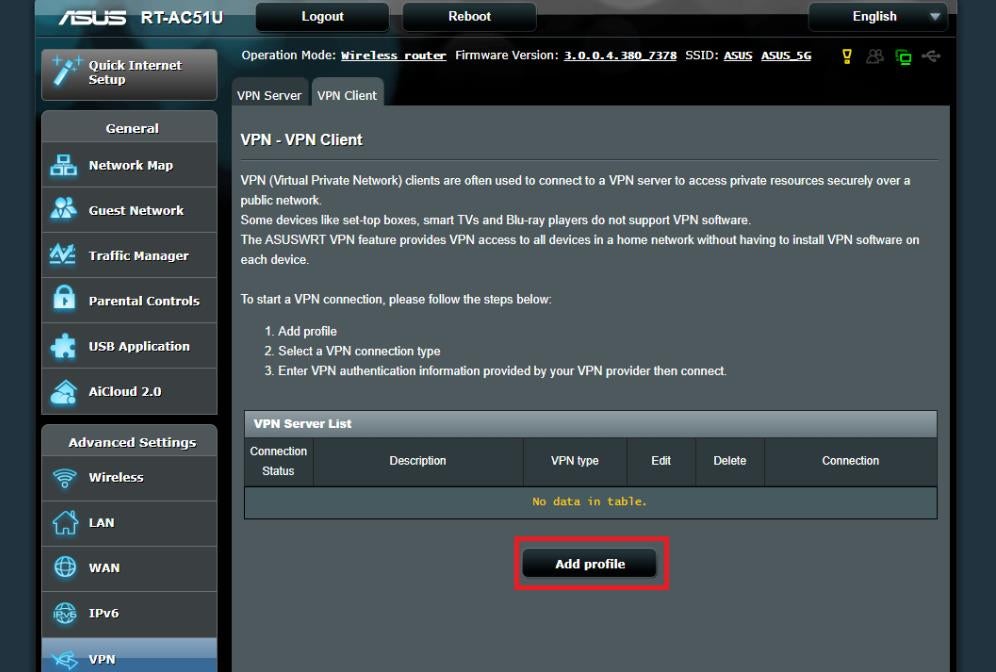
Add a profile
When the VPN client has opened, click the “add profile” button at the bottom of the page.
-
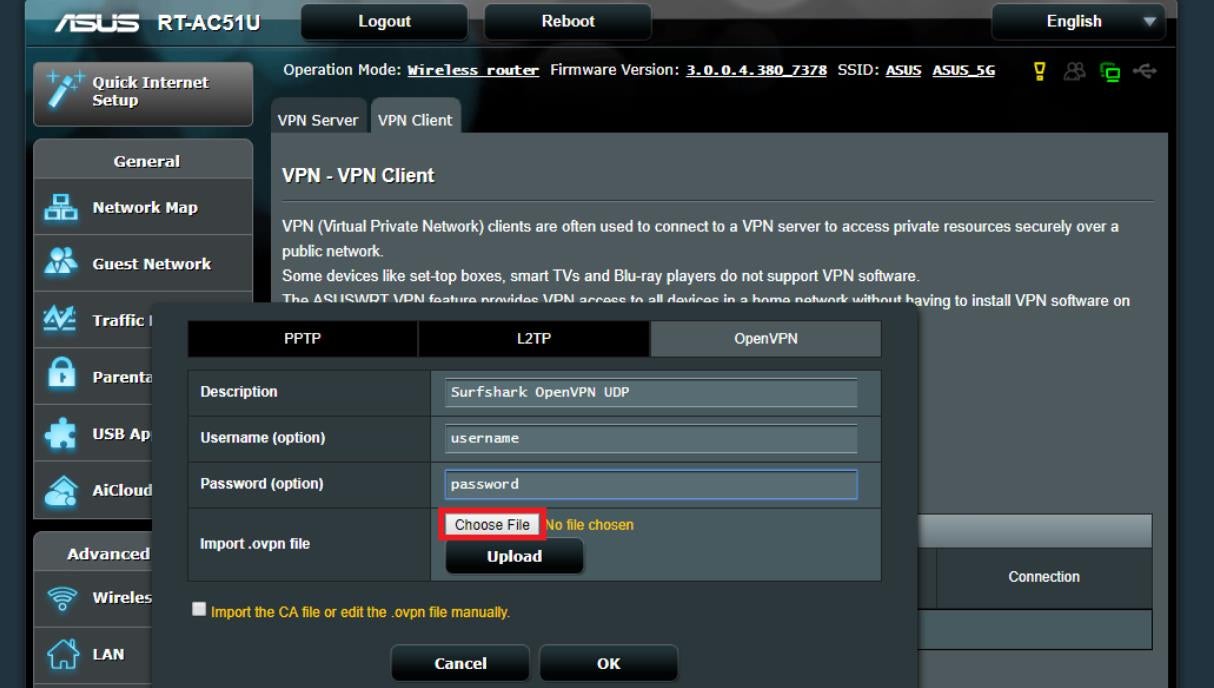
Select a VPN connection type
Select the OpenVPN tab and name the connection whatever you want. Next, enter your credentials. These credentials are your VPN client login details, which are the username and password. You can find these credentials in your VPN client dashboard. Please note that in addition to OpenVPN, which is the best VPN protocol for router configuration, there are other protocols supported by different routers. For example, MikroTik works well with the IKEv2 protocol, while TP-Link Deco works best with WireGuard.
-
Add a configuration file
Most routers will ask you to set up a static IP address or a dynamic DNS account. For this AsusWRT router tutorial, you will need to add a configuration file of the server you want to connect to. Go to the Router Control Panel and click “Choose File” and a message will appear asking you to choose the OpenVPN configuration file you want to use.
-
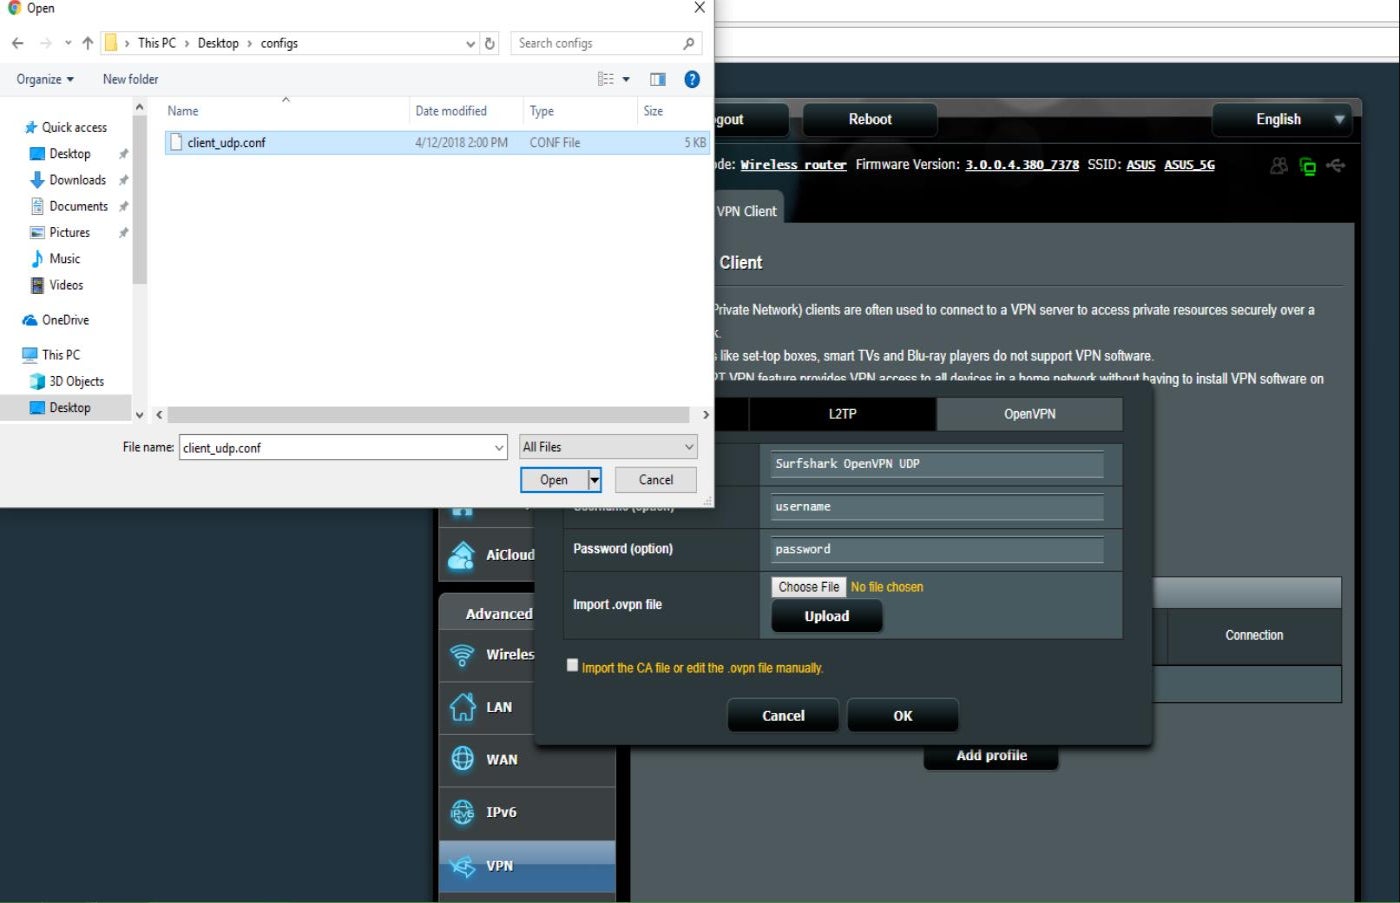
Select the directory of the downloaded file
After downloading OpenVPN, the next thing is to navigate to the file directory where you downloaded the configuration file and then click “Open.”
-
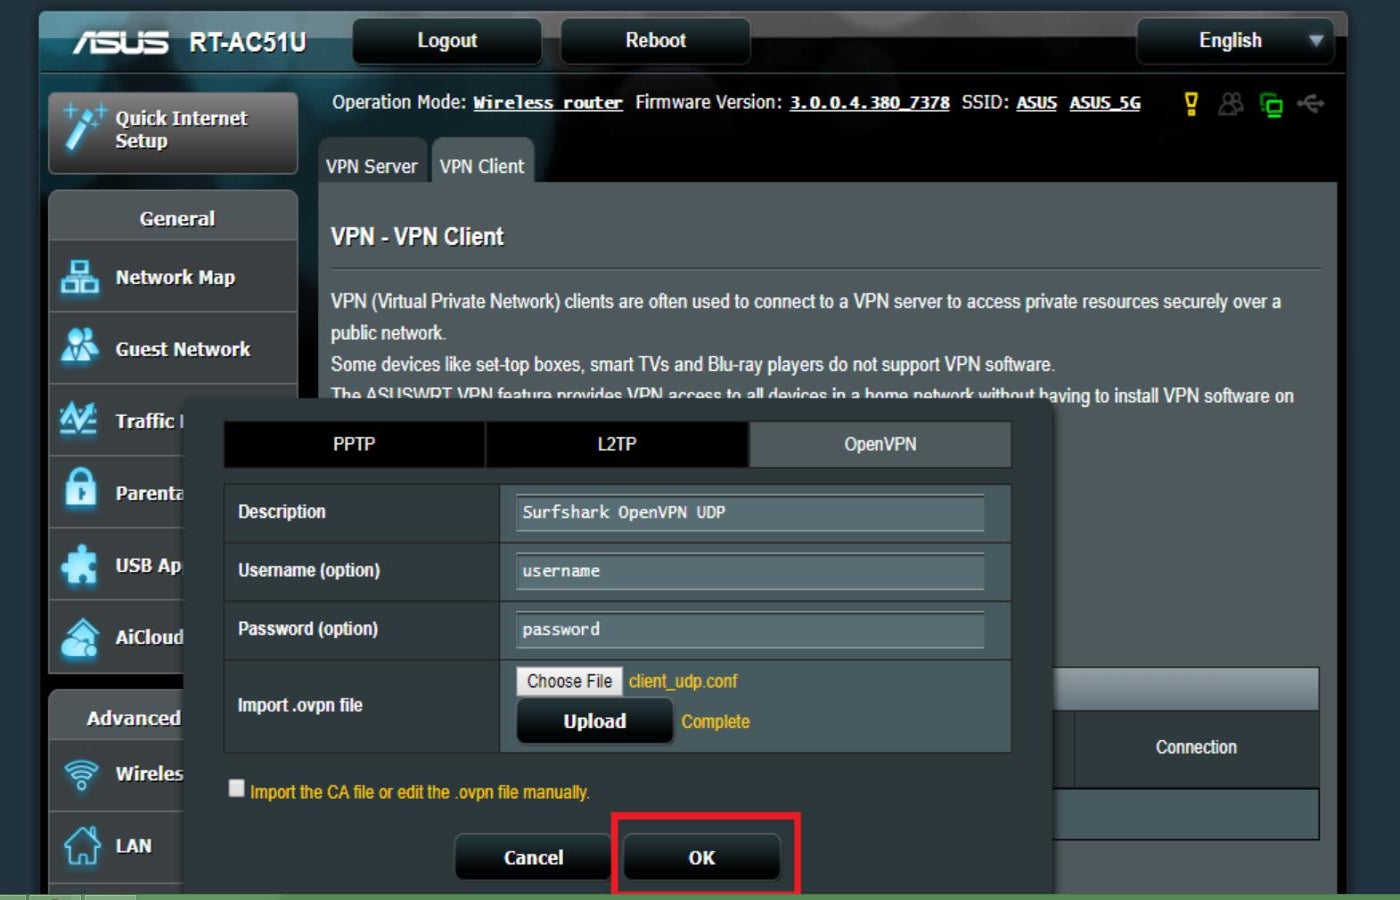
Load configuration file
Click “Load” after selecting the configuration file. You should see a message saying “Completed” if the upload was successful.
-
Click the “OK” button
Leave “Import the CA file or edit the .ovpn file manually” option unchecked, and then click “OK.”
-
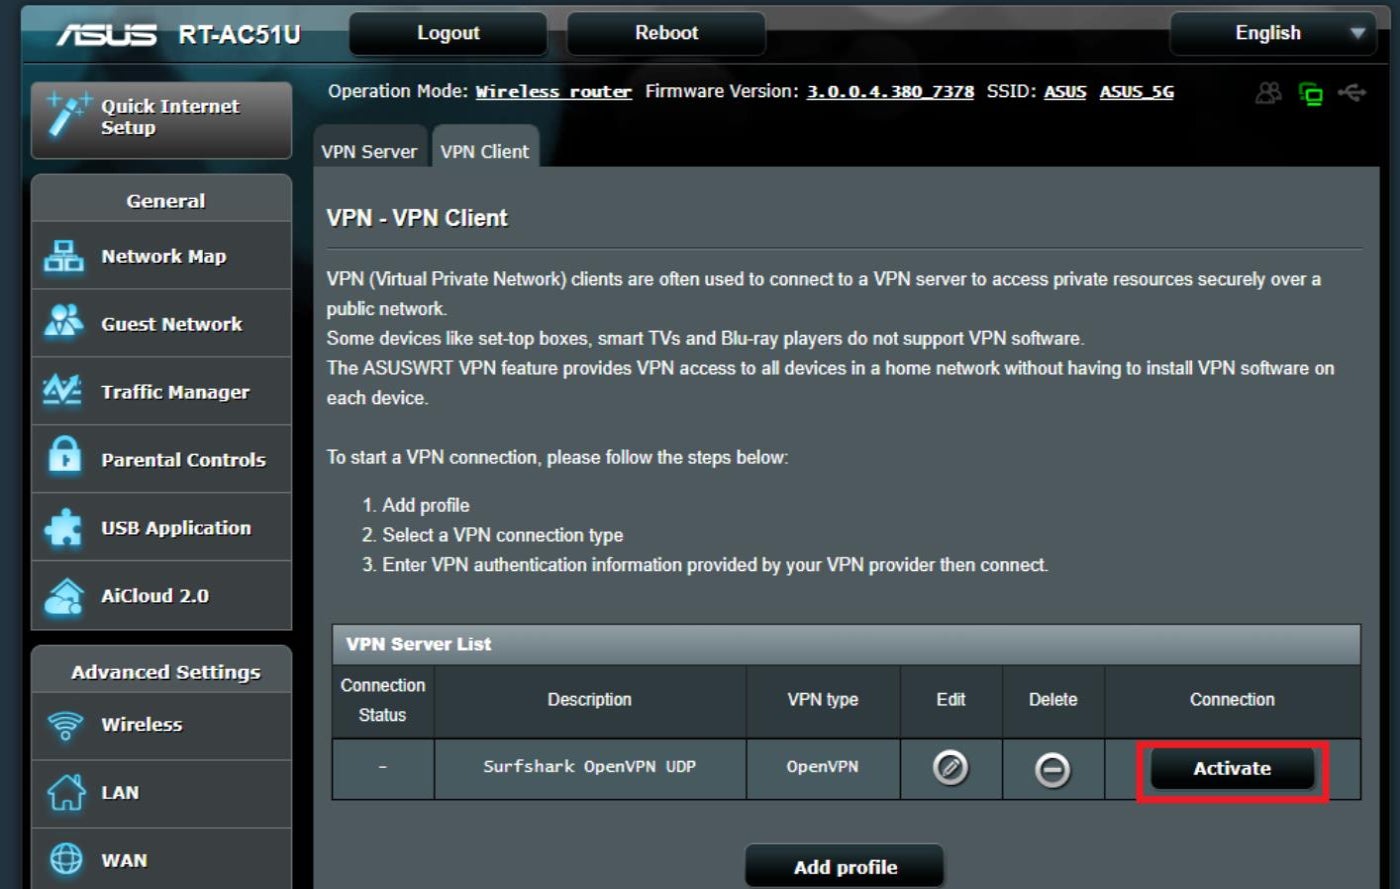
Click the “activate” button
Navigate to the VPN client tab and click “Activate” to connect your router to the VPN. Once connected, a blue check mark should appear in the “Connection Status” column, indicating that the VPN is now connected to the router.
SEE: How to use a VPN: 4 easy steps to get started (TechRepublic)
Please note that you can only create one OpenVPN connection at a time.
Do all routers support VPN?
Most routers come with built-in VPN capabilities or support multiple VPN services. Here are some options:
Asus RT-AX88U: Comes with built-in VPN support, including OpenVPN, PPTP, and L2TP/IPsec protocols. The router's VPN settings are very flexible.
SEE: Is a VPN really worth it in 2024? (Technological Republic)
pfSense 2.4.4 – This router and firewall software is frequently configured as a DHCP server, DNS server, Wi-Fi access point, and VPN server, all on the same physical device.
Netgear Nighthawk R7000 – Known for its solid performance, this router is compatible with most VPN clients. Currently, only OpenVPN version 2.7.1 or earlier works with Netgear routers.
Linksys WRT3200ACM – Has open source firmware support and allows easy installation of VPN client software such as OpenVPN.
SEE: 4 different types of VPNs and when to use them (TechRepublic)
Synology RT2600ac – Synology is a dual-band Wi-Fi 5 router that has built-in VPN client and server capabilities and supports VPN protocols such as OpenVPN, L2TP/IPsec, and PPTP.
How do I know if my router supports VPN?
Not all routers support a VPN network. However, some VPN companies like Surfshark, ExpressVPN, and NordVPN offer co-branded routers that offer easy setup.
If you have already purchased a router, you can determine if your router supports VPN by checking the specifications provided by the manufacturer. Look for terms like “VPN support” or “VPN passthrough” in the product description or user manual. You can also search on Google for the exact most “VPN-friendly” model. It is important to note that most router ISPs do not support VPNs.
SEE: The 4 best free VPNs for 2024 (TechRepublic)
You can also contact the manufacturer's customer service for confirmation or log into your router's management interface and check VPN-related settings or options.
Although it is feasible to enable VPN support on certain routers that are not initially configured through a process called “flashing,” this method carries risks and can potentially damage the router if not executed correctly.
Conclusion
As you can see, adding a VPN to your router is very easy if you follow the right steps. While the setup processes may vary slightly depending on your router model, the general procedures should be similar. If you haven't purchased a router yet, it is advisable to opt for one that supports the OpenVPN protocol, as it offers more flexibility and security. Please note that if you got the router from your ISP, you may not be able to set up a VPN on it. So be sure to thoroughly check the VPN compatibility of each router you want to buy next time.